请注意,本文编写于 189 天前,最后修改于 187 天前,其中某些信息可能已经过时。
目录
本文将介绍在 C# 中如何使用 GDI+ 来实现简单的点位运动。主要包括以下内容:
- GDI+ 绘图基础与关键类介绍
- 如何在窗体中进行平面坐标操作
- 利用计时器实现连续运动
- 高级思路:更加精准的运动控制与自定义轨迹
基础背景
GDI+(Graphics Device Interface Plus)是 Windows 绘图的基础库,用于在窗体上进行 2D 绘图。C# 通过 System.Drawing 命名空间提供了 GDI+ 的接口,而常用的绘图类和结构包括:
Graphics:图形绘制的核心类,支持绘制直线、矩形、文本等Pen:绘制线段等轮廓所需的画笔Brush:绘制填充区域时所需的画刷Point/PointF:表示坐标系中的一个点Rectangle/RectangleF:表示一个矩形区域
在进行运动控制时,往往需要在指定的坐标轨迹上移动点或图形,并根据计时器或反馈线程来刷新位置,从而达到动画或稳定控制的目的。
示例:在 WinForms 窗体中移动一个点
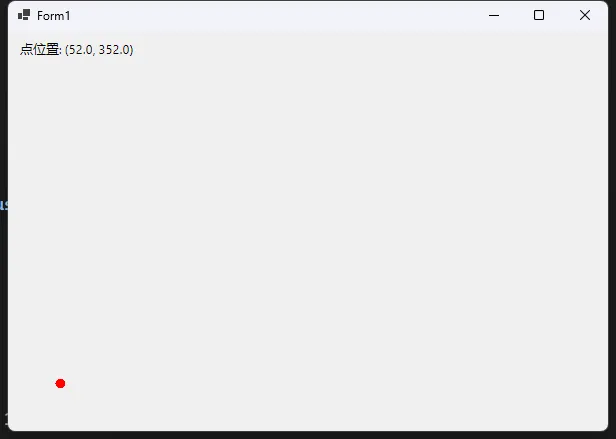
以下示例演示在 WinForms 窗体中,使用 GDI+ 并结合 Timer 实现一个点的运动。该示例包含完整的窗体类代码,可直接复制并创建一个新的 WinForms 项目测试。
创建 WinForms 项目
- 打开 Visual Studio,创建一个新的“Windows 窗体应用程序”项目。
- 在默认生成的
Form1中添加以下代码,或直接替换所有代码。
完整示例代码
C#using System;
using System.Drawing;
using System.Windows.Forms;

namespace PointMotionDemo
{
    public partial class Form1 : Form
    {
        // 点的位置
        private float _x = 50f;
        private float _y = 50f;

        // 水平与垂直方向速度
        private float _speedX = 2f;
        private float _speedY = 2f;

        // 窗体边界
        private float _minX, _maxX, _minY, _maxY;

        // 计时器
        private Timer _timer;

        public Form1()
        {
            InitializeComponent();

            // 设置双缓冲,减少闪烁
            this.DoubleBuffered = true;

            // 设定窗体大小
            this.ClientSize = new Size(600, 400);

            // 初始化计时器
            _timer = new Timer();
            _timer.Interval = 20; // 20ms 刷新一次,相当于每秒 50 帧
            _timer.Tick += Timer_Tick;
            _timer.Start();

            // 计算窗体中点的合法运动边界
            _minX = 0;
            _maxX = this.ClientSize.Width;
            _minY = 0;
            _maxY = this.ClientSize.Height;
        }

        private void Timer_Tick(object sender, EventArgs e)
        {
            // 移动点
            _x += _speedX;
            _y += _speedY;

            // 判断边界并反向
            if (_x < _minX || _x > _maxX)
            {
                _speedX = -_speedX;
            }
            if (_y < _minY || _y > _maxY)
            {
                _speedY = -_speedY;
            }

            // 重绘
            this.Invalidate();
        }

        protected override void OnPaint(PaintEventArgs e)
        {
            base.OnPaint(e);

            Graphics g = e.Graphics;

            // 绘制移动的点(用一个小圆表示)
            float radius = 10f;
            RectangleF rect = new RectangleF(_x - radius / 2, _y - radius / 2, radius, radius);
            using (Brush brush = new SolidBrush(Color.Red))
            {
                g.FillEllipse(brush, rect);
            }

            // 画一个简单的坐标说明
            string info = $"点位置: ({_x:F1}, {_y:F1})";
            using (Brush textBrush = new SolidBrush(Color.Black))
            {
                g.DrawString(info, this.Font, textBrush, new PointF(10, 10));
            }
        }
    }
}
代码说明
Timer的使用:通过Interval控制刷新间隔,在Tick事件中更新点位坐标并调用Invalidate()进行重绘。OnPaint方法:使用Graphics对象绘制点和文字。- 点位运动逻辑:最基础的做法是每次在坐标上累加速度。如果到达预设边界则将速度反向。
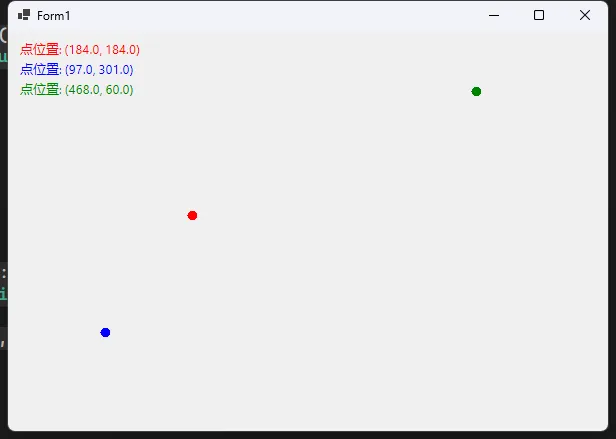
3. 进阶:多点运动与轨迹控制
- 多点运动:可以为窗体中的多个点分别设置位置和速度,每次刷新时分别更新每个点并在绘制时循环调用
FillEllipse。 - 复杂轨迹:在
_timer.Tick中,可以根据某些数学规则(如正弦函数sin(t))来计算坐标,或者根据预先定义的离散点数据进行插值,实现更加精细的轨迹。 - 定向到指定坐标:对于精确移动到目标坐标,可根据当前位置与目标位置计算方向向量并以固定速度移动,或实现类似 PID (比例-积分-微分)控制来实现平滑过渡。
多点运动
C#using Timer = System.Windows.Forms.Timer;

namespace AppMPointMotion
{
    public partial class Form1 : Form
    {
        // 定义一个点的类
        private class MovingPoint
        {
            public float X { get; set; }
            public float Y { get; set; }
            public float SpeedX { get; set; }
            public float SpeedY { get; set; }
            public Color Color { get; set; }
        }

        // 点的集合
        private List<MovingPoint> _points;

        // 窗体边界
        private float _minX, _maxX, _minY, _maxY;

        // 计时器
        private Timer _timer;

        public Form1()
        {
            InitializeComponent();

            // 设置双缓冲,减少闪烁
            this.DoubleBuffered = true;

            // 设定窗体大小
            this.ClientSize = new Size(600, 400);

            // 初始化点的集合
            _points = new List<MovingPoint>
            {
                new MovingPoint
                {
                    X = 50f,
                    Y = 50f,
                    SpeedX = 2f,
                    SpeedY = 2f,
                    Color = Color.Red
                },
                new MovingPoint
                {
                    X = 100f,
                    Y = 100f,
                    SpeedX = -3f,
                    SpeedY = 3f,
                    Color = Color.Blue
                },
                new MovingPoint
                {
                    X = 200f,
                    Y = 200f,
                    SpeedX = 4f,
                    SpeedY = -4f,
                    Color = Color.Green
                }
            };

            // 初始化计时器
            _timer = new Timer();
            _timer.Interval = 20; // 20ms 刷新一次,相当于每秒 50 帧
            _timer.Tick += Timer_Tick;
            _timer.Start();

            // 计算窗体中点的合法运动边界
            _minX = 0;
            _maxX = this.ClientSize.Width;
            _minY = 0;
            _maxY = this.ClientSize.Height;
        }

        private void Timer_Tick(object sender, EventArgs e)
        {
            // 移动每个点
            foreach (var point in _points)
            {
                point.X += point.SpeedX;
                point.Y += point.SpeedY;

                // 判断边界并反向
                if (point.X < _minX || point.X > _maxX)
                {
                    point.SpeedX = -point.SpeedX;
                }
                if (point.Y < _minY || point.Y > _maxY)
                {
                    point.SpeedY = -point.SpeedY;
                }
            }

            // 重绘
            this.Invalidate();
        }

        protected override void OnPaint(PaintEventArgs e)
        {
            base.OnPaint(e);

            Graphics g = e.Graphics;

            // 绘制移动的点(用小圆表示)
            float radius = 10f;
            foreach (var point in _points)
            {
                RectangleF rect = new RectangleF(point.X - radius / 2, point.Y - radius / 2, radius, radius);
                using (Brush brush = new SolidBrush(point.Color))
                {
                    g.FillEllipse(brush, rect);
                }
            }

            // 画点位置信息
            float yOffset = 10f;
            foreach (var point in _points)
            {
                string info = $"点位置: ({point.X:F1}, {point.Y:F1})";
                using (Brush textBrush = new SolidBrush(point.Color))
                {
                    g.DrawString(info, this.Font, textBrush, new PointF(10, yOffset));
                    yOffset += 20f;
                }
            }
        }
    }
}
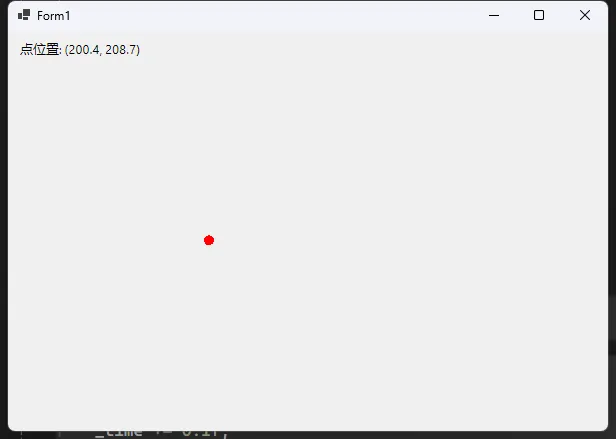
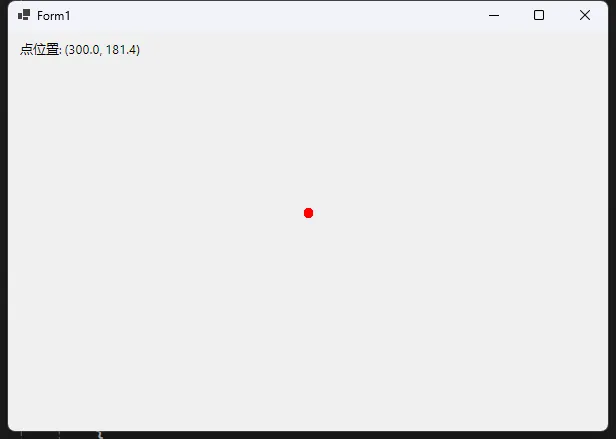
正弦曲线轨迹
C#private float _time = 0f;

private void Timer_Tick(object sender, EventArgs e)
{
    // 正弦曲线轨迹
    _time += 0.1f;
    _x = ClientSize.Width / 2 + (float)(100 * Math.Sin(_time));
    _y = ClientSize.Height / 2 + (float)(100 * Math.Cos(_time));

    this.Invalidate();
}
贝塞尔曲线轨迹
C#private PointF[] _controlPoints;
private float _t = 0f;

private void InitializeBezierCurve()
{
    _controlPoints = new PointF[]
    {
        new PointF(50, 50),
        new PointF(200, 10),
        new PointF(350, 200),
        new PointF(500, 300)
    };
}

private PointF CalculateBezierPoint(float t)
{
    // 三次贝塞尔曲线插值
    float u = 1 - t;
    float tt = t * t;
    float uu = u * u;
    float uuu = uu * u;
    float ttt = tt * t;

    PointF p = new PointF(
        uuu * _controlPoints[0].X +
        3 * uu * t * _controlPoints[1].X +
        3 * u * tt * _controlPoints[2].X +
        ttt * _controlPoints[3].X,
        uuu * _controlPoints[0].Y +
        3 * uu * t * _controlPoints[1].Y +
        3 * u * tt * _controlPoints[2].Y +
        ttt * _controlPoints[3].Y
    );

    return p;
}

private void Timer_Tick(object sender, EventArgs e)
{
    _t += 0.01f;
    if (_t > 1) _t = 0;

    PointF point = CalculateBezierPoint(_t);
    _x = point.X;
    _y = point.Y;

    this.Invalidate();
}
物理模拟轨迹(带阻尼)
C#private float _vx = 2f;
private float _vy = 2f;
private float _damping = 0.99f;
private float _gravity = 0.5f;

private void Timer_Tick(object sender, EventArgs e)
{
    // 简单物理模拟
    _vy += _gravity;
    _x += _vx;
    _y += _vy;

    // 边界反弹并衰减速度
    if (_x < _minX || _x > _maxX)
    {
        _vx = -_vx * _damping;
    }
    if (_y < _minY || _y > _maxY)
    {
        _vy = -_vy * _damping;
    }

    this.Invalidate();
}
性能与注意事项
- 使用
double-buffered(双缓冲)可以显著减少闪烁。 - 在
OnPaint中进行复杂操作时,需要注意效率,避免在绘制线程中进行过度计算。 - 如果要进行更复杂或专业的运动控制(如 CNC、运动控制卡等),则需结合第三方库或硬件控制接口。
总结
利用 GDI+ 在 C# 窗体中实现点位运动是学习 2D 图形绘制和基本运动控制的入门起点。通过定时刷新坐标并重绘图形,可以实现形形色色的动画效果和交互功能。此外,更高级的工具或算法(如 WPF 的动画机制、DirectX/OpenGL、PID 控制算法等)都可以在此基础上结合,创造更丰富的应用场景。
希望以上示例能帮助你快速上手基于 C# 与 GDI+ 的点位运动!
本文作者:rick
本文链接:
版权声明:本博客所有文章除特别声明外,均采用 BY-NC-SA 许可协议。转载请注明出处!
目录