请注意,本文编写于 178 天前,最后修改于 178 天前,其中某些信息可能已经过时。
目录
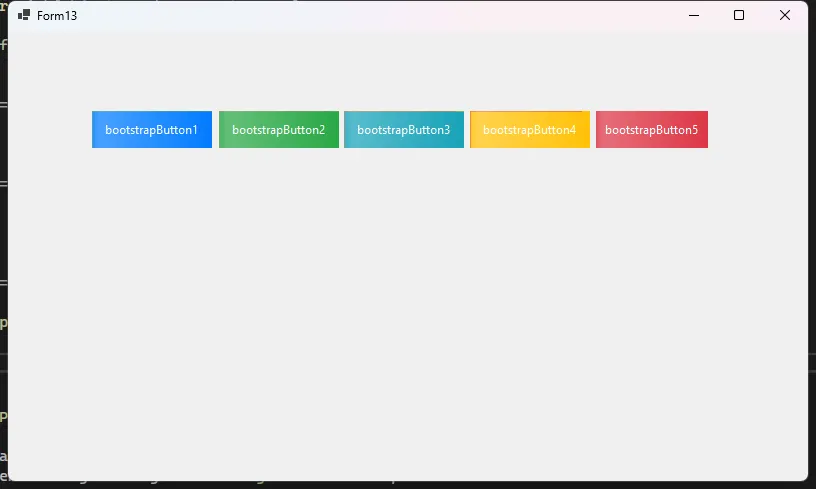
在Windows窗体应用程序(WinForms)中,默认的Button控件功能有限,且美观性不佳。通过自定义Button控件,我们可以实现更丰富的视觉效果。本文将介绍如何使用C#和GDI+创建一个具有Bootstrap风格和动画效果的自定义Button控件。
前言
自定义控件可以满足特定的需求,提高应用程序的用户体验。通过使用GDI+,我们可以绘制复杂的图形,并实现自定义的绘制逻辑。
准备工作
在开始之前,请确保您已经安装了Visual Studio,并熟悉C#和WinForms开发。
创建自定义Button控件
继承Button控件
首先,我们需要创建一个自定义控件类,继承自Button:
C#using System;
using System.Drawing;
using System.Windows.Forms;
using System.ComponentModel;

public class BootstrapButton : Button
{
    // 在此处添加代码
}
添加属性
为支持不同的样式,我们可以添加属性来控制按钮的外观。例如,添加一个ButtonStyle属性:
C#public enum BootstrapStyle
{
    Primary,
    Success,
    Info,
    Warning,
    Danger
}

private BootstrapStyle buttonStyle = BootstrapStyle.Primary;

[Category("Appearance")]
[Description("设置按钮的Bootstrap样式")]
public BootstrapStyle ButtonStyle
{
    get { return buttonStyle; }
    set { buttonStyle = value; Invalidate(); }
}
重写OnPaint方法
重写OnPaint方法以自定义按钮的绘制:
C#protected override void OnPaint(PaintEventArgs pevent)
{
    base.OnPaint(pevent);

    Graphics g = pevent.Graphics;
    g.SmoothingMode = System.Drawing.Drawing2D.SmoothingMode.AntiAlias;

    // 绘制按钮背景
    Rectangle rect = new Rectangle(0, 0, this.Width, this.Height);
    Color backColor = GetBackColor();
    using (SolidBrush brush = new SolidBrush(backColor))
    {
        g.FillRectangle(brush, rect);
    }

    // 绘制按钮文字
    TextRenderer.DrawText(
        g,
        this.Text,
        this.Font,
        rect,
        this.ForeColor,
        TextFormatFlags.HorizontalCenter | TextFormatFlags.VerticalCenter
    );
}
实现Bootstrap样式
定义颜色和样式
根据Bootstrap的配色方案,定义不同样式对应的颜色:
C#private Color GetBackColor()
{
    switch (buttonStyle)
    {
        case BootstrapStyle.Primary:
            return ColorTranslator.FromHtml("#007bff");
        case BootstrapStyle.Success:
            return ColorTranslator.FromHtml("#28a745");
        case BootstrapStyle.Info:
            return ColorTranslator.FromHtml("#17a2b8");
        case BootstrapStyle.Warning:
            return ColorTranslator.FromHtml("#ffc107");
        case BootstrapStyle.Danger:
            return ColorTranslator.FromHtml("#dc3545");
        default:
            return Color.Gray;
    }
}
示例代码
完整的BootstrapButton代码如下:
C#using System;
using System.Drawing;
using System.Windows.Forms;
using System.ComponentModel;
using Timer = System.Windows.Forms.Timer;

public class BootstrapButton : Button
{
    public enum BootstrapStyle
    {
        Primary,
        Success,
        Info,
        Warning,
        Danger
    }

    private BootstrapStyle buttonStyle = BootstrapStyle.Primary;

    [Category("Appearance")]
    [Description("设置按钮的Bootstrap样式")]
    public BootstrapStyle ButtonStyle
    {
        get { return buttonStyle; }
        set { buttonStyle = value; Invalidate(); }
    }

    private Timer animationTimer = new Timer();
    private float animationProgress = 0f;
    private bool isHovering = false;

    public BootstrapButton()
    {
        animationTimer.Interval = 15;
        animationTimer.Tick += AnimationTimer_Tick;
        this.FlatStyle = FlatStyle.Flat;
        this.FlatAppearance.BorderSize = 0;
    }

    protected override void OnMouseEnter(EventArgs e)
    {
        base.OnMouseEnter(e);
        isHovering = true;
        animationTimer.Start();
    }

    protected override void OnMouseLeave(EventArgs e)
    {
        base.OnMouseLeave(e);
        isHovering = false;
        animationTimer.Start();
    }

    private void AnimationTimer_Tick(object sender, EventArgs e)
    {
        float increment = 0.03f; // 调小这个值可以让动画更平滑
        if (isHovering)
        {
            animationProgress = Math.Min(animationProgress + increment, 1f);
        }
        else
        {
            animationProgress = Math.Max(animationProgress - increment, 0f);
        }

        Invalidate();

        if (animationProgress == 0f || animationProgress == 1f)
        {
            animationTimer.Stop();
        }
    }

    protected override void OnPaint(PaintEventArgs pevent)
    {
        Graphics g = pevent.Graphics;
        g.SmoothingMode = System.Drawing.Drawing2D.SmoothingMode.AntiAlias;

        Rectangle rect = new Rectangle(0, 0, this.Width, this.Height);

        // 创建渐变画刷
        Color baseColor = GetBackColor();
        Color gradientColor = BlendColor(baseColor, Color.White, 0.3f);

        // 计算渐变的起始和结束位置
        float gradientPosition = this.Width * animationProgress;

        using (System.Drawing.Drawing2D.LinearGradientBrush gradientBrush =
            new System.Drawing.Drawing2D.LinearGradientBrush(
                rect,
                baseColor,
                gradientColor,
                System.Drawing.Drawing2D.LinearGradientMode.Horizontal))
        {
            // 创建渐变色彩混合
            float[] positions = { 0.0f, animationProgress, 1.0f };
            Color[] colors = { baseColor, gradientColor, baseColor };

            // 创建ColorBlend对象
            System.Drawing.Drawing2D.ColorBlend colorBlend =
                new System.Drawing.Drawing2D.ColorBlend();
            colorBlend.Positions = positions;
            colorBlend.Colors = colors;

            // 设置渐变画刷的颜色混合
            gradientBrush.InterpolationColors = colorBlend;

            // 绘制按钮背景
            g.FillRectangle(gradientBrush, rect);
        }

        // 绘制文本
        TextRenderer.DrawText(
            g,
            this.Text,
            this.Font,
            rect,
            Color.White,
            TextFormatFlags.HorizontalCenter | TextFormatFlags.VerticalCenter
        );
    }

    private Color GetBackColor()
    {
        switch (buttonStyle)
        {
            case BootstrapStyle.Primary:
                return ColorTranslator.FromHtml("#007bff");
            case BootstrapStyle.Success:
                return ColorTranslator.FromHtml("#28a745");
            case BootstrapStyle.Info:
                return ColorTranslator.FromHtml("#17a2b8");
            case BootstrapStyle.Warning:
                return ColorTranslator.FromHtml("#ffc107");
            case BootstrapStyle.Danger:
                return ColorTranslator.FromHtml("#dc3545");
            default:
                return Color.Gray;
        }
    }

    private Color BlendColor(Color color1, Color color2, float amount)
    {
        float r = color1.R + (color2.R - color1.R) * amount;
        float g = color1.G + (color2.G - color1.G) * amount;
        float b = color1.B + (color2.B - color1.B) * amount;
        return Color.FromArgb((int)r, (int)g, (int)b);
    }

    protected override void OnMouseDown(MouseEventArgs mevent)
    {
        base.OnMouseDown(mevent);
        this.Scale(new SizeF(0.95f, 0.95f));
    }

    protected override void OnMouseUp(MouseEventArgs mevent)
    {
        base.OnMouseUp(mevent);
        this.Scale(new SizeF(1.0526f, 1.0526f));
    }
}
总结
通过自定义Button控件并使用GDI+进行绘制,我们实现了一个具有Bootstrap风格和动画效果的按钮。该控件不仅美观,而且可扩展,可根据需要添加更多样式和功能。
本文作者:rick
本文链接:
版权声明:本博客所有文章除特别声明外,均采用 BY-NC-SA 许可协议。转载请注明出处!
目录