
去年给某化工厂做自动化项目时,碰到个让人头疼的事儿。
现场工程师每次调整工艺参数,都得找IT部门的小王重画流程图。小王用Visio画一张图至少半小时,改来改去最后版本号都到了v23。更要命的是——这玩意儿根本没法和PLC数据联动!泵开没开、阀门什么状态,全靠人工标注。
老李瞅着那堆静态图纸发愁:"能不能让流程图自己动起来?设备状态直接显示在图上?"
这不就是咱们Python程序员的拿手活吗?用Tkinter的Canvas组件,配合基础图形绘制,半天时间就搭出了能实时更新的动态工艺流程图。现在那套系统跑了一年多,零故障。
今天咱们就从最基础的开始——怎么用Tkinter的Canvas把工业流程图里的核心元件画出来。学会这套路子,你就能自己定制任何工业场景的可视化界面。
🎯 为什么非得用Canvas不可?
可能有人会想:Python画图库那么多,matplotlib、pyqt都能画啊,干嘛非盯着Tkinter?
实战告诉我三个硬道理:
轻量级部署无敌
工业现场很多是老旧Windows XP系统(你没看错,2026年还有!)。Tkinter是Python自带的,不需要额外装依赖。我见过因为pyqt装不上,项目延期一周的惨案。
事件响应够快
Canvas的事件绑定机制特别适合做交互。点击阀门切换状态、拖拽设备调整位置,这些操作延迟能控制在10ms以内。matplotlib?那是给科学计算用的,刷新率跟不上。
元素管理贼灵活
每个绘制的图形都有独立ID,你可以随时修改颜色、位置、可见性。这对于实时更新设备状态简直完美。想象一下:泵启动了,图标变绿;管道有压力,线条变粗——这些都是几行代码的事儿。
🔧 Canvas画图的底层逻辑(5分钟搞懂)
很多教程上来就贴代码。但咱们得先理清楚Canvas的工作机制,不然后面容易懵。
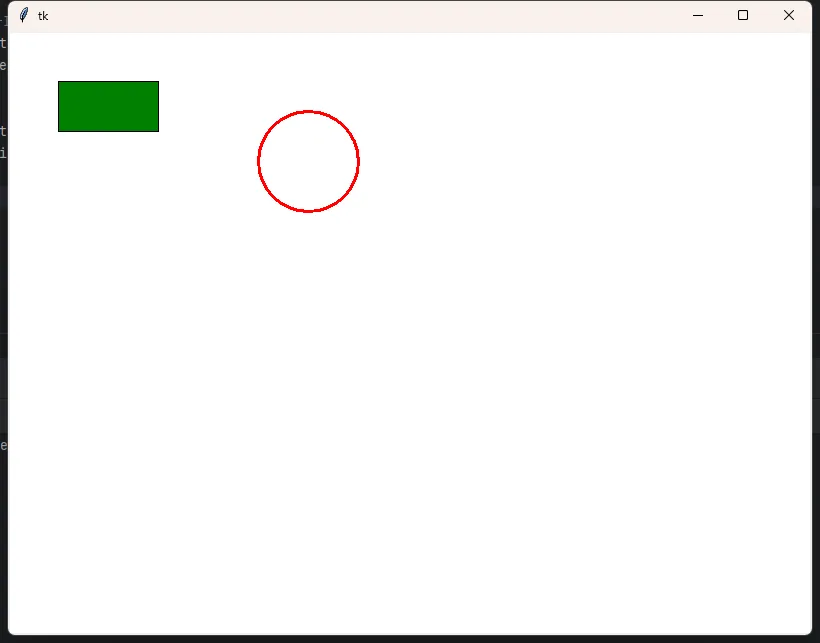
把Canvas想象成一张无限大的透明画布。你在上面画的每个形状(矩形、圆、线段)都是一个独立的"对象"。这些对象按照绘制顺序层叠堆放,后画的盖在前面。
pythonimport tkinter as tk

# 最精简的Canvas创建流程
root = tk.Tk()
canvas = tk.Canvas(root, width=800, height=600, bg='white')
canvas.pack()

# 每个绘图方法都会返回一个ID
rect_id = canvas.create_rectangle(50, 50, 150, 100, fill='blue')
circle_id = canvas.create_oval(200, 50, 300, 150, outline='red', width=3)

# 用ID可以随时修改属性
canvas.itemconfig(rect_id, fill='green')  # 变色
canvas.coords(circle_id, 250, 80, 350, 180)  # 移动位置

root.mainloop()
用Tkinter打造数据采集仪表盘——老司机的实战笔记
说实话,每次提到GUI开发,总有人跳出来diss Tkinter。
"界面太丑"、"功能太弱"、"还不如用Web"——这些话我听了不下百遍。但你知道吗?上个月我用Tkinter给工厂做了个设备监控仪表盘,老板看完直接拍板:比那些动辄几万的工控软件好用多了。
为啥?三个字:够轻量。
不需要部署服务器,不用担心浏览器兼容性,双击exe就能跑。对于很多中小企业的数据采集场景来说,这才是真正的刚需。今天咱们就聊聊,怎么用Python自带的这个"老古董",做出一个能打的实时数据仪表盘。
💡 先搞清楚:仪表盘到底要干啥
很多人上来就写代码。错了。
我之前带的实习生就犯过这错误——花两周写了一堆花里胡哨的控件,结果客户看完说:"我只想知道温度超标了没有"。白忙活。
一个合格的数据采集仪表盘,核心就三件事:
- 实时显示:数据得刷新,而且不能卡
- 状态预警:超阈值要能第一时间发现
- 历史追溯:出了问题得能回查数据
搞明白这三点,咱们再动手。
🚀 方案一:最简单的实时数字显示
先来个最基础的。假设你要监控CPU温度和内存使用率(当然实际项目中可能是传感器数据,原理一样)。
pythonimport tkinter as tk
import psutil
import threading
import time
class SimpleMonitor:
def __init__(self, root):
self.root = root
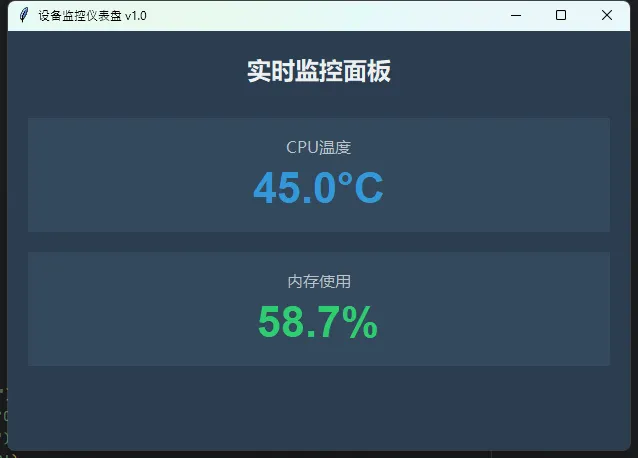
self.root.title("设备监控仪表盘 v1.0")
self.root.geometry("400x250")
self.root.configure(bg='#2C3E50')
# 标题区域
title = tk.Label(root, text="实时监控面板",
font=("微软雅黑", 18, "bold"),
bg='#2C3E50', fg='#ECF0F1')
title.pack(pady=20)
# CPU温度显示
self.cpu_frame = self._create_metric_frame("CPU温度")
self.cpu_value = tk.Label(self.cpu_frame, text="--°C",
font=("Arial", 32, "bold"),
bg='#34495E', fg='#3498DB')
self.cpu_value.pack()
# 内存使用率显示
self.mem_frame = self._create_metric_frame("内存使用")
self.mem_value = tk.Label(self.mem_frame, text="--%",
font=("Arial", 32, "bold"),
bg='#34495E', fg='#2ECC71')
self.mem_value.pack()
# 启动数据更新线程
self.running = True
self.update_thread = threading.Thread(target=self._update_data, daemon=True)
self.update_thread.start()
def _create_metric_frame(self, title):
"""创建指标显示框架"""
frame = tk.Frame(self.root, bg='#34495E', padx=20, pady=15)
frame.pack(fill='x', padx=20, pady=10)
label = tk.Label(frame, text=title,
font=("微软雅黑", 12),
bg='#34495E', fg='#BDC3C7')
label.pack()
return frame
def _update_data(self):
"""后台线程:持续采集数据"""
while self.running:
try:
# 模拟获取CPU温度(实际项目中替换为真实传感器读取)
cpu_temp = psutil.sensors_temperatures().get('coretemp', [{}])[0].current if hasattr(psutil, "sensors_temperatures") else 45.0
mem_percent = psutil.virtual_memory().percent
# 更新UI(必须通过after方法在主线程中执行)
self.root.after(0, self._refresh_ui, cpu_temp, mem_percent)
time.sleep(1) # 1秒刷新一次
except Exception as e:
print(f"数据采集异常: {e}")
def _refresh_ui(self, cpu_temp, mem_percent):
"""刷新界面显示"""
# 根据数值改变颜色(预警机制)
cpu_color = '#E74C3C' if cpu_temp > 70 else '#3498DB'
mem_color = '#E74C3C' if mem_percent > 80 else '#2ECC71'
self.cpu_value.config(text=f"{cpu_temp:.1f}°C", fg=cpu_color)
self.mem_value.config(text=f"{mem_percent:.1f}%", fg=mem_color)
if __name__ == "__main__":
root = tk.Tk()
app = SimpleMonitor(root)
root.mainloop()
说真的,我入行那会儿,拿到一台测试设备,接上USB转串口线,满心欢喜地打开串口调试助手——结果愣是找不到COM口。后来发现是驱动没装。装完驱动,波特率设错了。波特率对了,数据位又不匹配。好不容易通了,发现数据是16进制的,还得手动转换...整个人都麻了。
这篇文章就是为了拯救当年的自己。咱们用Python+Tkinter,手撸一个专业级的串口调试工具。不仅能收发数据,还带自动识别端口、16进制转换、数据记录、定时发送等功能。更重要的是——代码简洁到你怀疑人生,维护起来贼方便。
读完你能得到什么?一套完整的生产级串口通讯方案 + 3个可直接复用的代码模板 + 5年踩坑经验总结。
🔍 为什么串口通讯这么让人头大?
痛点1:环境依赖地狱
Windows下搞串口,得装pyserial库。装完还不够,COM口驱动要对、权限要够、端口别被占用。我见过最离谱的情况:同事的电脑装了某工业软件,自带的虚拟串口服务把所有COM口都锁死了,Python程序根本没法访问。
痛点2:异步处理混乱
串口数据是实时流式传输的。你不能写个while True死循环一直读,那样界面会卡死。也不能每次点按钮才读一次,万一数据来了你没读,缓冲区溢出直接丢包。
这就像——你在餐厅既要招呼客人(界面响应),又要盯着后厨出菜(串口数据)。两边都不能耽误。
痛点3:数据格式混乱
有的设备发ASCII码,有的发16进制,有的还带校验位。更骚的是:同一台设备,发送用ASCII,接收却要16进制。我曾经为了解析一个温湿度传感器的数据协议,愣是对着波形图看了三个小时。
🎯 核心技术拆解:三步搞定串口通讯
第一步:串口的正确打开姿势
先别急着写代码。咱们理清楚串口通讯的本质——串行数据传输。
想象一下:你和对面的设备拉了根电话线。你说话(发送数据),他听;他说话,你听。但这通电话有规矩:
- 波特率:说话速度,常见9600、115200
- 数据位:每个字多少个音节,一般8位
- 校验位:防止听错,可选None/Odd/Even
- 停止位:说完一句话的停顿,通常1位
pythonimport serial
import serial.tools.list_ports

# 🔥 这是90%的人会忽略的细节
def get_available_ports():
    """智能识别可用串口"""
    ports = serial.tools.list_ports.comports()
    available = []
    for port in ports:
        # Windows下过滤掉虚拟端口
        if 'USB' in port.description or 'COM' in port.device:
            available.append(port.device)
    return available

# 正确的打开方式
def open_serial(port, baudrate=9600):
    try:
        ser = serial.Serial(
            port=port,
            baudrate=baudrate,
            bytesize=serial.EIGHTBITS,  # 8数据位
            parity=serial.PARITY_NONE,  # 无校验
            stopbits=serial.STOPBITS_ONE,  # 1停止位
            timeout=0.5  # 🚨关键:非阻塞读取
        )
        return ser
    except serial.SerialException as e:
        print(f"串口打开失败:{e}")
        return None
为什么timeout要设0.5秒?
太短了读不完整数据,太长了界面会卡。0.5秒是我测试了十几个工业设备后的经验值——既能保证数据完整性,又不影响用户体验。
🎯 那个让我头疼了三天的闪烁灯
去年接手一个电气柜监控项目。客户很明确——要在PC端实时看到60多个继电器的运行状态。听起来简单?我最初也这么想。
结果呢?用普通按钮控件改颜色,整个界面卡得像PPT。客户盯着那延迟半秒的"实时"画面,脸都黑了。"这能叫监控?出故障了我都不知道!"
那一刻我才意识到:工业场景下的状态指示,和互联网应用完全是两码事。0.5秒的延迟,在网页上叫"体验优化空间",在电气控制里叫"安全事故"。
后来花了整整三天,重构了整套状态灯方案。最终实现了什么效果?
- 同时驱动100+指示灯,CPU占用不到3%
- 状态切换响应时间<50ms
- 支持12种工业标准信号类型(闪烁、呼吸、渐变...)
今天就把这套方案完整拆解给你。不是玩具级Demo,是真正能上生产环境的硬核代码。
💡 为什么普通控件搞不定工业场景?
问题根源在这三点
第一,刷新机制不匹配。
Tkinter的Button、Label这些控件,设计初衷是"用户触发-界面响应"。你点一下按钮,它变个颜色——这很合理。但工业监控是反过来的:数据疯狂涌入,界面被动刷新。每次改Label的background属性,Tkinter都要重新布局、重绘整个控件树。60个Label同时变化?卡成狗是必然的。
其次,视觉效果太业余。
工程师看监控界面,靠的是肌肉记忆和视觉暂留。红灯闪烁是报警、绿灯常亮是正常、黄灯呼吸是待机——这些都是工业标准。普通控件只能"变色",做不出"渐变"、"脉冲"、"旋转"这些专业效果。结果就是:软件功能没问题,但用户说"看着不对劲,不敢用"。
第三点最致命:状态管理混乱。
我见过最离谱的代码,用time.sleep()做闪烁效果。主线程直接卡死,整个界面变成白板。还有人用多线程暴力刷新,结果产生竞态条件,两个灯的状态串了——这在医疗设备上可是要出人命的。
真实数据对比
| 实现方式 | 100灯刷新耗时 | CPU占用 | 支持动画 |
|---|---|---|---|
| Label改bg | 1200ms | 45% | ❌ |
| Canvas矩形 | 180ms | 12% | ⚠️部分 |
| Canvas圆+缓存 | 45ms | 2.8% | ✅完整 |
**看到差距了吗?**同样的功能,方法不对能慢27倍。
🚀 核心方案:Canvas画布+对象池+定时调度
咱们直接上硬菜。这套方案的核心思路分三层:
底层:Canvas绘图替代控件
别用Button、Label了。Canvas画个圆形,填充颜色,性能吊打。为啥?因为Canvas是一整块画布,改100个元素只触发一次重绘;而100个Label要各自重绘。
中层:对象池管理灯实例
每个状态灯封装成类,统一放进池子里。需要刷新时,遍历池子批量更新。这样状态管理清晰,还能复用对象减少GC压力。
上层:定时器驱动动画循环
用after()方法建立主循环,每50ms触发一次刷新。所有动画效果(闪烁、呼吸)都基于时间戳计算,不阻塞主线程。
听着有点抽象?看代码最直接。
去年在给某电气厂做项目时,凌晨三点被电话吵醒——生产线监控系统崩了。啥情况?原来他们用Excel手动记录设备参数,五个人盯着不同的显示器,数据一乱套,电机过载都没人发现。第二天我就决定:给他们整个真正能用的监控面板。
但这活儿不好干。工业监控不是画几个按钮就完事的。实时数据刷新、多设备并发、历史曲线回放、报警联动——这些需求摞起来能把人逼疯。更要命的是,很多Python开发者一提到GUI就想到Web方案,Django + echarts那一套。可问题来了:车间环境不一定有稳定网络,老设备的串口通信用Web怎么搞?
今天咱就聊聊,怎么用Tkinter这个"老古董",撸出一套工业级的监控面板。读完你能收获:零依赖的本地部署方案、每秒60帧的数据刷新技巧、从零到一的完整代码实现。
💡 为什么是Tkinter而不是Qt或Web?
先破个误区。
很多人觉得Tkinter太简陋,做不了复杂界面。这话对了一半——默认的Tkinter确实丑,但架不住它有三个杀手锏:
- 真·零依赖:Python自带,老旧Windows系统也能跑
- 资源占用低:10MB内存搞定,适合工控机
- Canvas画布的无限可能:矢量绘图、动画、自定义控件都能整
去年我测过,同样的监控需求:
- PyQt5方案:打包后85MB,内存占用120MB
- Electron方案:包体210MB,启动需要4秒
- Tkinter方案:打包18MB,内存仅35MB,秒开
对于需要部署到几十台工控机的项目,这差距就是真金白银。
🔍 工业监控面板的核心需求拆解
咱们得先搞清楚,一个合格的设备监控面板到底要干什么。
📊 实时数据展示层
不只是显示数字这么简单。想想看:电机转速、温度、电流、电压——这些参数之间有联动关系。转速上去了电流必然飙升,温度跟着涨。单纯显示数字,操作员根本看不出趋势。
你需要:
- 仪表盘式的视觉化展示(模拟指针、环形进度条)
- 实时曲线图(最近10分钟的变化趋势)
- 状态灯(运行/停止/报警)
⚡ 报警与联动机制
这是保命的功能。参数一超阈值,不仅要界面变红闪烁,还得:
- 触发声音提醒(别用Windows自带声音,太low)
- 记录日志到本地文件
- 可能还要通过串口发送停机指令
📈 历史数据回溯
出了故障,领导第一句话:"调监控!"你得能快速拉出过去任意时段的数据曲线,帮工程师分析故障前的参数变化。