
🔥 .NET开发者必知:Keyed Services彻底解决多实现依赖注入难题
你是否曾经为了在同一个接口的多个实现之间进行选择而苦恼?传统的依赖注入只能获取到最后注册的服务实现,或者通过IEnumerable<T>获取所有实现。如果你想精确地获取某个特定实现,就不得不写复杂的工厂模式或条件判断代码。
好消息是:.NET 8引入了Keyed Services(键控服务)功能,在.NET 9中得到进一步完善,这个特性将彻底改变你处理多实现场景的方式!
今天,我们将深入探索这个强大的新特性,通过实际案例让你快速掌握并应用到项目中。
🎯 传统依赖注入的痛点分析
在开发通知系统时,我们经常遇到这样的场景:
c#public interface INotificationService
{
    string SendNotification(string message);
}

// 三种不同的通知实现
public class EmailService : INotificationService
{
    public string SendNotification(string message) => $"[邮件] {message}";
}

public class SmsService : INotificationService
{
    public string SendNotification(string message) => $"[短信] {message}";
}

public class PushService : INotificationService
{
    public string SendNotification(string message) => $"[推送] {message}";
}
传统注册方式的局限性
c#var builder = WebApplication.CreateBuilder(args);
builder.Services.AddSingleton<INotificationService, EmailService>();
builder.Services.AddSingleton<INotificationService, SmsService>();
builder.Services.AddSingleton<INotificationService, PushService>();
嘿,说个真事儿。上周我在code review的时候,看到一个实习生写了这么一段代码:
pythonuser_data = {'name': 'Rick', 'age': 28}
if 'email' in user_data. keys():
    email = user_data['email']
else:
    email = 'not_provided@example.com'
我当时就乐了——这代码能跑,但写法透着股"我刚学完if-else"的青涩味儿。要知道,Python字典提供的dict.get()方法一行就能搞定,而且性能还更好。这就是今天咱们要聊的核心:字典操作看似简单,但里面的门道能让你的代码从"能用"升级到"专业"。
一般来Python初学者"字典操作"是他们最早接触但最晚真正掌握的数据结构。今天这篇文章,我会用10年踩坑经验带你彻底搞懂字典的6大核心操作,保证看完立马能用到项目里。
🔍 为什么字典操作总让人「似懂非懂」?
问题根源:思维惯性的陷阱
很多人学字典时,会不自觉地套用其他语言的思维。比如Java程序员习惯性写dict.keys()再遍历,C++转来的朋友总想着"越底层越高效"。但Python字典的设计哲学是——简洁优雅,让解释器帮你优化。
我见过最离谱的案例:某团队维护的老项目里,有段查找用户配置的代码,用了五层嵌套try-except来处理KeyError。结果呢?每次查询耗时从应该的0.001ms飙到0.3ms,就因为异常捕获的开销。
三个致命误区
- 过度防御型编程:到处写
if key in dict,其实很多场景get()方法自带的默认值机制更香 - 盲目追求"Pythonic":看到推导式就用,结果把简单的添加操作写成了晦涩的单行代码
- 忽视哈希表特性:不知道字典底层是哈希实现,在需要有序性的���景硬用字典(Python 3.7+虽然保序了,但得知道原理)
💡 字典核心操作:六大招式逐个击破
🎯 第一式:键值查找的三重境界
境界一:新手村——直接索引
pythonuser = {'name': 'Alice', 'age': 25}
print(user['name']) # 基本刚入行,或其它语言转过来习惯这么干
在使用Tkinter开发桌面应用时,你是否遇到过这样的困境:界面控件越来越多,布局越来越乱,想要实现类似专业软件的多区域界面却无从下手? 本文将带你深入理解Tkinter的Frame嵌套机制,通过实战案例演示如何像搭积木一样构建出专业级的复杂界面布局。无论是三栏式后台管理界面,还是带有工具栏、侧边栏、状态栏的完整应用,掌握Frame嵌套技巧后都能轻松实现。
🤔 为什么需要嵌套Frame?
传统布局的痛点
很多Python初学者在使用Tkinter时,习惯将所有控件直接放在主窗口上:
pythonimport tkinter as tk

root = tk.Tk()
root.title("混乱的布局")

# 所有控件都直接放在root上
tk.Label(root, text="用户名: ").grid(row=0, column=0)
tk.Entry(root).grid(row=0, column=1)
tk.Label(root, text="密码:").grid(row=1, column=0)
tk.Entry(root, show="*").grid(row=1, column=1)
tk.Button(root, text="登录").grid(row=2, column=0)
tk.Button(root, text="取消").grid(row=2, column=1)

root.mainloop()
这种方式在简单场景下没问题,但当需求变复杂时就会遇到:
- 维护困难:所有控件的row/column索引混在一起,修改布局需要重新计算大量坐标
- 复用性差:无法将某个功能模块整体移动或复用
- 扩展受限:想添加侧边栏、工具栏等区域时,原有布局全部需要调整
Frame嵌套的优势
Frame就像是界面中的容器盒子,将相关控件组织在一起。通过嵌套Frame,我们可以:
✅ 分区管理:将界面划分为独立的功能区域
✅ 层次清晰:代码结构与视觉布局保持一致
✅ 灵活调整:修改某个区域不影响其他部分
✅ 模块复用:将常用布局封装成函数或类
🏗️ Frame嵌套的核心原理
Frame的本质
Frame是Tkinter中的容器控件,它本身可以包含其他控件,也可以包含其他Frame。可以把它理解为:
主窗口(Tk)
├── Frame1 (顶部工具栏)
│   ├── Button1
│   ├── Button2
│   └── Button3
├── Frame2 (主体区域)
│   ├── Frame2-1 (左侧边栏)
│   │   └── Listbox
│   └── Frame2-2 (右侧内容)
│       ├── Label
│       └── Text
└── Frame3 (底部状态栏)
    └── Label
三大布局管理器与Frame的配合
Tkinter提供了三种布局管理器,它们与Frame配合使用时各有特色:
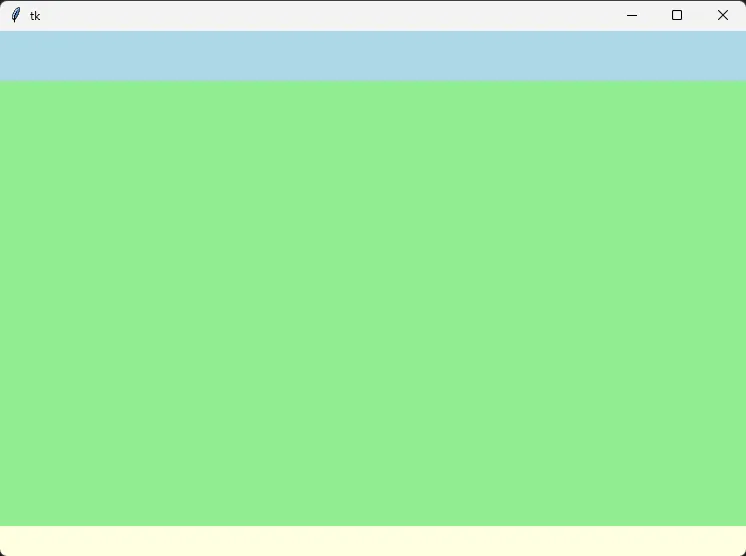
1. pack - 适合线性堆叠布局
pythonimport tkinter as tk

root = tk.Tk()
root.geometry("400x300")

# 顶部Frame - 自动填充宽度
top_frame = tk.Frame(root, bg="lightblue", height=50)
top_frame.pack(side=tk.TOP, fill=tk.X)

# 中间Frame - 占据剩余空间
middle_frame = tk.Frame(root, bg="lightgreen")
middle_frame.pack(side=tk.TOP, fill=tk.BOTH, expand=True)

# 底部Frame - 固定高度
bottom_frame = tk.Frame(root, bg="lightyellow", height=30)
bottom_frame.pack(side=tk.BOTTOM, fill=tk.X)

root.mainloop()
 核心参数解析:
side:决定控件堆叠方向(TOP/BOTTOM/LEFT/RIGHT)fill:控件是否填充分配的空间(X/Y/BOTH)expand:是否占用父容器的剩余空间(True/False)
你是否遇到过这样的问题:窗体刚显示就闪退?数据还没加载完用户就能操作界面?窗体关闭时数据丢失?这些都与窗体生命周期的理解不当有关。
作为C#开发者,深入理解Winform窗体生命周期不仅能避免90%的界面bug,还能让你的应用更加流畅稳定。本文将通过实战代码,带你彻底掌握Load、Shown、Closing等关键事件的正确使用方式。
🔍 窗体生命周期全景图
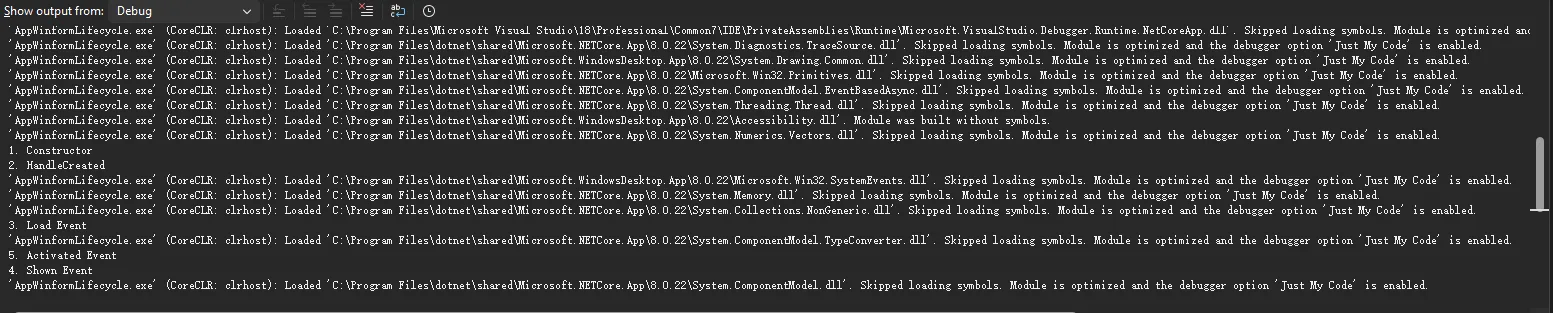
📊 生命周期事件执行顺序
c#using System.Diagnostics;

namespace AppWinformLifecycle
{
    public partial class Form1 : Form
    {
        public Form1()
        {
            InitializeComponent();
            // 1. 构造函数 - 最先执行
            Debug.WriteLine("1. Constructor");
        }

        protected override void OnHandleCreated(EventArgs e)
        {
            // 2. 句柄创建 - 窗体句柄被创建
            Debug.WriteLine("2. HandleCreated");
            base.OnHandleCreated(e);
        }

        private void Form1_Load(object sender, EventArgs e)
        {
            // 3. Load事件 - 窗体首次加载
            Debug.WriteLine("3. Load Event");
        }

        protected override void OnShown(EventArgs e)
        {
            // 5. Shown事件 - 窗体首次显示给用户
            Debug.WriteLine("4. Shown Event");
            base.OnShown(e);
        }

        private void Form1_Activated(object sender, EventArgs e)
        {
            // 4. Activated事件 - 窗体获得焦点
            Debug.WriteLine("5. Activated Event");
        }
    }
}
🚀 提示词工程入门:让AI真正听懂你的"话"
你有没有过这样的经历——明明向ChatGPT提出了需求,结果它却答非所问? 或者明明想要一篇专业报告,却只得到了几行敷衍的文字?
问题的根源往往不在AI本身,而在于我们与它"对话"的方式。就像与人沟通需要技巧一样,和AI交流同样需要掌握方法。这便是提示词工程诞生的缘由——它不是简单地"提问题",而是一门系统化的学科,帮助我们精准地驾驭大模型的能力。
据统计,优质的提示词能让AI输出质量提升300%以上。可惜的是,大多数人仍停留在"随便问问"的阶段,白白浪费了手中强大工具的潜力。今天,咱们就来彻底搞懂提示词工程这件事——从底层逻辑到实战技巧,手把手教你如何让AI成为你的"超级助理"。

🎯 提示词≠提示词工程: 别再混为一谈
什么是提示词?
简单说,提示词(Prompt)就是你给AI下达的指令。
想象一下,你走进一家餐厅,对服务员说:"给我来点吃的。"结果可能是一碗面,也可能是一盘青菜——因为你的需求太模糊了。但如果你说:"我想要一份中辣的麻婆豆腐,米饭少盛一点,再来一碗紫菜蛋花汤。"这时,服务员就能精准理解你的需求。